Hi, I'm Christoph, the developer of compress-or-die.com.
I hereby ask you to accept the cookies
of the self-hosted Matomo Tracking software which I use to analyze the traffic to this website.
You can revoke your consent at any time on the following page: Privacy policy.
This article is the follow-up article to Finally understanding JPG, which I would like to recommend to anyone who would like a deeper but generally understandable introduction to JPG compression.
This time however I would like to explain the functionality of a PNG and will show you at the end of the article how you can reduce the file size of your PNGs with the help of Compress-Or-Die (that I will call COD in the rest of the article).
As with the previous article, I will present some aspects in a simplified way if it facilitates understanding, because no one is helped by mathematician buzzword bingo and few of those who would like to reduce their image sizes are mathematicians, but more likely webworkers or digital advertising specialists.
In order to be able to compare file sizes resulting from the use of different tools (compress-or-die.com, Photoshop, TinyPNG and Co.), I would like refer you to the section Comparable file sizes in the JPG article.
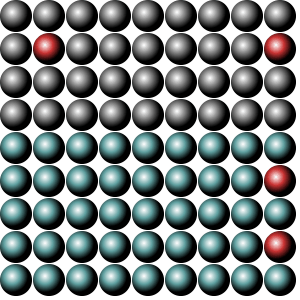
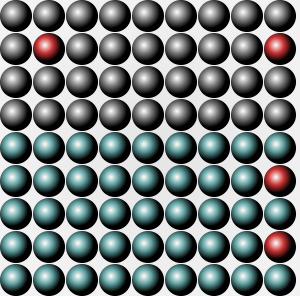
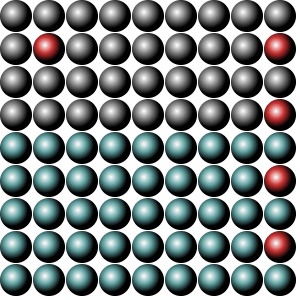
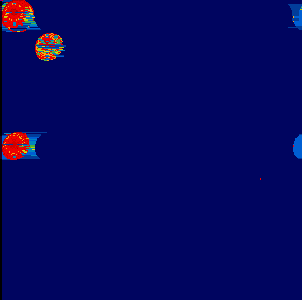
Now let's begin. Take a look at these two balls-pictures:
4,492 B
128,025 B
Both images look the same, have the same width and height, both are PNGs, but the file size is significantly different. Why?
In the course of the article, I will continue to work with this image and bring you closer to the subtleties that lead to this fact.
Most of your images will be in the RGB color model (as is our example image), and thus one pixel of your image consists of the three colors (or color channels) red, green, and blue, each of which can have 256 gradations.
256 increments, because each color of a pixel should be represented by the memory consumption of 1 byte. And one byte can represent exactly 256 values.
With a memory consumption of 3 bytes, an entire pixel can be displayed (1 byte each for red, green and blue).
If you now have a 800 x 600 px large image, this results in a memory consumption of 800 x 600 x 3 byte = 1,440,000 B = 1.44 MB.
This is also pretty much the size of an uncompressed BMP image (and incidentally the size of a 3.5 " HD floppy disk ... for all who can still remember).
I you wanted to label the color depth, you could speak of a 3-byte image.
Since, however, there are color depths other than 1 byte per channel, the designation 24-bit picture (that is, 3x8-bit picture) has been used for an image, because 1 byte is composed of 8 bits.
The depth of color thus means the memory consumption of a pixel.
The two other color depths that you will run across when you are puzzling with the PNG image format are 32-bit and 8-bit:
A 32-bit PNG is similar to a 24-bit PNG, but it also contains an additional 8-bit channel for transparency information (usually called alpha channel).
Thus, an image may also include transparent regions in 256 gradations.
By the way, Photoshop does not show a selection box for 32-bit PNGs in the "Save for Web ..." dialog.
You have to select "PNG-24" and mark the checkbox with the name "transparency".
An 8-bit PNG works a bit differently. Here, up to 256 colors are defined with their red, green, blue and transparency information in a so-called palette, and for each pixel just the position of the color in the palette will be stored.
Thus, to store a pixel, you only need 1 byte of memory for the position of the color in the palette. Then the saving of the pallete is added. However, with such a picture, you are limited to a maximum of 256 colors, but this is more than enough for the majority of the images for which it makes sense to save them as PNGs.
Therefore, this is the most significant color depth in the area of PNG compression.
The three color depths here once again in a short overview:
8-bit PNG
24-bit PNG
32-bit PNG
Palette image
RGB image
RGBA image
Maximum of 256 colors
16.8 million colors
16.8 million colors + transparency
This is one of the reasons why the first PNG with the balls is smaller than the other.
The first, smaller PNG is an 8-bit PNG, while the larger PNG is a 32-bit PNG.
Now we know what color depths mean and how we can calculate the file size of an uncompressed image, but the data still occupies a lot of space and needs to be compressed accordingly.
Data can be compressed best if it is repeated as often as possible. So, by pre-filtering, you try to generate the same data from different data.
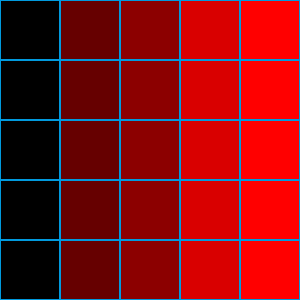
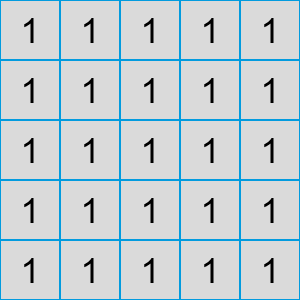
Let's take a look at the red values of a 5x5 px image:
The red tones ...
... and their numerical representation
On each line you could use the filter "Sub" (one of 5 possible filters), which means that we simply remember the difference to the previous value.
This step can be reversed afterwards, so no data is getting lost.
In our example, it is noted for each line that the filter "Sub" was used.
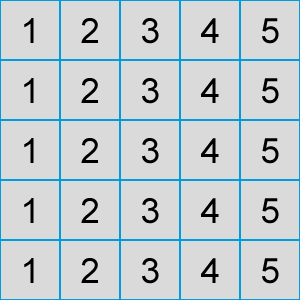
Our values to be saved now look like this and are now much better to compress:
The values filtered by "Sub"
These filters, along with the deflate compression used internally, are the reason why the PNG is a nose ahead of the GIF and therefore almost always smaller.
And they provide an important tactic for optimizing the compression of a PNG.
Each PNG algorithm has the ungrateful task of finding out which filter is best for which line in order to repeat as much data as possible.
But if it now adapts the filter for line 3 so that the data is similar to those from line 2, it might be that they are no longer similar to those from row 5.
Which solution is the better one?
Finding the optimal filter for each line is a science in itself, which, of course, could be approached with brute computer power.
But since you probably do not want to wait a week in front of your computer, until the PNG is finally calculated, the filters are selected by experience values and assumptions.
Some programs do this better than others.
Another possibility would be to adjust your image data so that the filters can work better.
This is then a lossy process because your original image data is no longer recoverable.
If you have, for example, a black surface, which in reality is not purely black, but consists of many almost black pixels with different intensity values, you have a disadvantageous situation as far as compression goes.
If you adjust this state by giving the same black value to all pixels, you will see that your file size shrinks significantly, even though your eye sees no difference.
LZ77 is a loss-free data compression process that tries to find repetitive sequences of data.
If the algorithm encounters a sequence of data that has been previously used in the file, it replaces it with a reference to the first sequence:
"Here, please use the sequence of data that appears 1300 characters further up and is 200 characters long".
Thus a PNG can store repetitive data excellently.
If you have the same representation of objects in a PNG file, only the first display occupies space.
The others will be given to you for free.
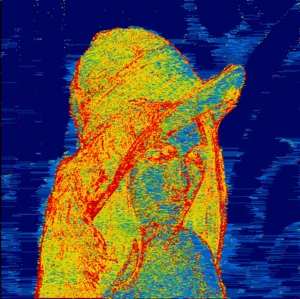
If you create a PNG in COD, you will probably already have seen the picture with the heading compression view (in a forum also lovingly called Predator vision).
This picture shows you how much memory expenditure had to be invested in a certain area of the image.
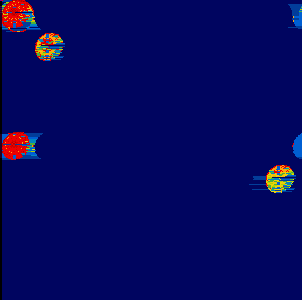
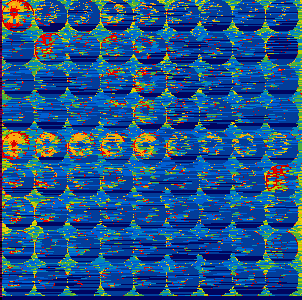
The two compression views for the ball images are as follows:
4,492 B
128,025 B
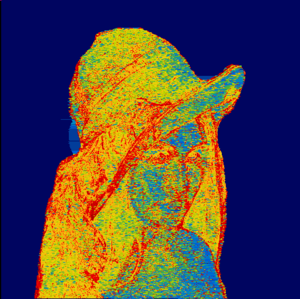
Dark blue means that this area occupies virtually no memory, light blue a bit memory, yellow more memory and red a lot of memory.
We can see clearly in the first picture, that only the first appearance of the colored balls costs storage space.
All others were given to you “for free” as their representations correspond exactly to the first ball of the same color.
And in the second picture you can now clearly see that the balls just look the same, but in reality no ball corresponds to another.
Each ball must be stored individually.
This is because, for demonstration purposes in the second picture, I superimposed a slight gradient and slight noise over the entire picture.
Actually, you should have just stumbled over something ... why does the third red ball occupy storage space, although two identical red balls have already been used in the image?
This is due to the fact that PNG internally uses the deflate algorithm developed by Phil Katz in 1996, which uses a sliding window of 32 kB due to low memory capacities at that time.
This means that only the previous approx. 32,000 characters are checked for reccuring sequences.
Thus, if the distance between two objects is too great, it will no longer be recognized that both objects are equal, and thus each object is saved individually.
I can show you this by building a bridge and by coloring the ball between the second and third ball also in red.
4,492 B
4,050 B
The third red ball disappears from the compression view and the file becomes even smaller.
This is the last step of the PNG compression.
In this case, an attempt is made to display each character with a bit sequence as small as possible in order to further shrink the file.
With a bit of computer-power it is possible to get some effect with this method.
This is attempted, for example, if you set COD to "Extreme compression".
Otherwise there is nothing else about this method, that is important for understanding PNGs.
Be careful to compress the original data, and not image data that may have already become a victim of a non-PNG image compression algorithm.
8,494 B
The source image here is a JPG that produces artifacts that are "fatal" to PNG compression.
Firstly, a lot of colors are created, secondly, image patterns are created, which are not included in the original and must now also be saved.
Interestingly, you can also see in the compression view, whether a picture has been converted to a JPG, in which case the compression view, as in this example, looks blocky (due to the 8x8 px grid of the JPG compression).
If this is the case, try to get the original data of the image.
The result should then rather look like this and be a lot smaller:
In many graphics programs it is possible to work not only on whole pixels, but also to move objects by half pixels.
However, if you want to save a graphic from cloned objects perfectly as PNG, the objects must be absolutely identical so that only the first object occupies memory space.
Fortunately, you can recognize this in the compression view very quickly.
Be careful not to accidentally move objects that are repeated several times in your image (especially in non-100% zooms), not to scale, not to distort, not to rotate, etc.
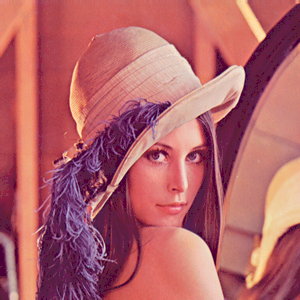
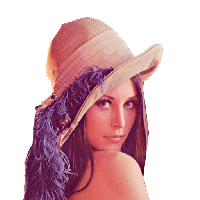
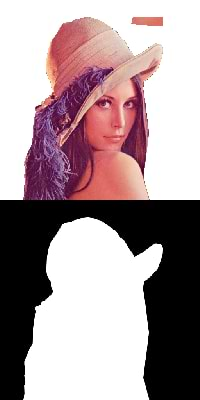
"Dirty transparency" refers to image regions which are 100% transparent, but still contain all color information in the other color channels.
This is often the case with masked images and ensures that space is wasted by invisible image information.
Areas with 100% transparency are automatically cleaned by COD, but unclean masking with the brush can also result in areas with 98% or 99% transparency remaining, which takes up space because the original image content is still present.
The area around Lena should actually be transparent, but in the compression view you can see clearly that some data is compressed there:
36,948 B
The cleaned picture is 11% smaller with the same image impression:
Usually the quality of an 8-bit PNG should always be sufficient.
Therefore, generation of an 8-bit PNG is also set as the default in COD.
Your image will be reduced to a maximum of 256 colors.
Missing colors are simulated by Dithering.
Play with the slider for the number of colors.
Straight, flat pictures such as logos almost never need 256 colors.
A good rule of thumb is to calculate eight additional colors for each color in the picture so that the Antialiasing looks clean.
If a logo consists of the colors red, blue and black, it should be enough to set the color slider to 24.
Posterization is the process of color reduction within an image.
This is useful because in an RGB image there are often more colors than the human eye can distinguish.
Through the posterization very similar colors are now combined into one.
This is only disturbing if the colors really differ.
Because there are more equal color values in an image, the PNG filters work better and the file becomes smaller.
You can adjust this in COD via the "Quality" control for 24-bit PNGs.
Particularly in the case of grainy images with a slight image noise, it is a good idea to work with the selective blur that you find in COD in the "preprocessing" area.
It ensures that details remain sharp, but surfaces are softened.
Since the PNG filters work better with the resulting clean surfaces, the image becomes smaller.
Normally, JPG does not support transparency.
But the use of javascript can compensate for this flaw as long as the image is used in the web environment.
Upload a transparent PNG in COD and you will get a transparent JPG and the corresponding HTML-Code to be able to integrate the image into your website.
Especially in the case of large transparent images such as images of products, the resulting image is much smaller than a transparent PNG would be.
It is even smaller than an 8-bit PNG.
47,219 B
18,020 B
10,685 B
32-bit PNG.
8-bit PNG with 256 colors.
JPG with transparency.
And now we're at the end. If you have any questions, suggestions, wishes or the like drop me a line.
Otherwise, you can also experiment with the ball image:
If you always wanted to know how the JPEG compression works under the hood I want to recommend this article to you. It was important to me to write an article that is reasonable for every level of understanding.
Furthermore it contains 7 valuable tricks to reduce the file size of your JPEGs by exploiting the technical functionality of the JPEG compression algorithm.
There are a lot of articles about online image compression tools in the net, most of them are very superficial.
Usually they end with a simple: "It generates smaller pictures, so it's got to be better."
Learn why such statements are most of the time meaningless, understand the technical background, and find out which tool you should use as of today.
You don't like ads? Support Compress-Or-Die and become a patron who does not see ads. Your upload limit gets doubled too!
News
COD says Goodbye
2026-06-24
After 10 years of compress-or-die.com, it’s time for me to say goodbye. It’s been a great time—I’ve learned a lot technically, but I’ve also met some wonderful people.
compress-or-die.com was created back then to get the most out of graphics for small banners. At the time, I was still working at an advertising agency. And over time, it just kept growing and growing.
But some of you may have noticed that over the past two years, there have been hardly any changes, and there hasn’t been much from me to read—which was quite different back in the day.
But a lot has changed in my personal life: children, new and different hobbies, and health issues have shifted my focus in other directions. And so, I had less and less time and motivation left for this project that was once so close to my heart.
For this reason, this chapter is now coming to an end. I’d like to thank all of you for using COD and for providing such great feedback, which helped COD grow so much.
I’d especially like to thank the Patrons who have covered the server costs over the past few years. Thank you so much!
On July 25, 2026, I will send COD into its well-deserved retirement.
All the best to you all,
Christoph
Check out our Reddit channel if you want to comment on the news.